| Apwide Golive")
Quick Overview
To set up a Jira Data Center test environment, you need a separate Jira instance where you can test changes without affecting your live system. This means creating a full copy of your production setup on a new server. Your test environment should stay isolated, up-to-date, and well-documented.
This article is focused on Jira Data Center only. If you are on Jira Cloud, use the Sandbox feature (available on Premium and Enterprise plans) to clone your environment.
Testing new features, upgrades, or plugins in your live Jira system is risky. That’s why setting up a Jira test environment is one of the smartest things you can do to protect your production instance. The idea is simple: create a safe space to test without impacting your real users. In this guide, we'll walk through all the main topics you need to understand and set up a complete test environment.
What Is a Jira Test Environment?
A Jira test environment is a separate copy of your Jira setup used to safely test changes. This is different from managing test environments from Jira, which refers to environments (like staging or QA) that your team is tracking or coordinating from Jira.
Quick Clarification:
- Jira test environment: where you test Jira itself
- Test environment in Jira: where you manage and track non-Jira systems through Jira
Before getting started, here’s a quick real-world example to set the stage.
Story: a QA team at a mid-sized company tested a new automation rule in their Jira test environment and avoided sending thousands of unintended notifications to users, simply because they had a safe place to trial the change first.
It’s decisions like this that prevent big mistakes. To make sure you’re prepared, start with this Pre-Setup Checklist before making any changes.
Pre-Setup Checklist
Before you start, confirm the following:
- Ensure full admin access to Jira and its infrastructure
- Understand how to backup and restore your instance
- Have access to a Jira Data Center developer license
- List critical integrations (LDAP, SSO, API connections, etc.)
- Choose a test environment URL (like testjira.company.com)
- Prepare to isolate emails to avoid notifying real users
Setting Up a Test Environment in Jira DC
Here's what the process looks like with Docker, Windows or Linux:
Docker Setup
- Use official Atlassian Docker images: Install Docker and Docker Compose, then create a directory for persistent Jira data (and shared home if needed, for more details, check Docker Hub- atlassian/jira-software ).
- Write a docker-compose.yml with Jira and PostgreSQL containers: Configure Jira with persistent volumes, PostgreSQL connection settings, and JVM memory. Set up PostgreSQL with a persistent volume and optional port mapping.
- Mount volumes for persistence and isolate the environment
- Restore your production backup and launch Jira via browser: the backup inside the containerManually copy attachments, avatars, and other files (use docker volume inspect to find the path)
For more details, check the official Atlassian forum post discussing the deployment and configuration of Jira in containers. How to run Jira in a docker container, How to run Jira in a Docker container.
Windows Setup
Step 1: Install Jira on a New Server
- Use a dedicated server, this can be a physical machine or a virtualized environment.
- Make sure to Install the Jira version that matches your production system’s requirements, access the Jira Data Center installation file from the official Download Archives the official Download Archives.
- Use separate install and home directories
Step 2: Backup and Restore Your Production Database
- Backup production Database (Jira officially supports PostgreSQL 12+ (check your version compatibility in Atlassian Supported Platforms).
- Restore into the test environment Database
(The manipulation of the PostgreSQL database and the use of the pg_dump and pg_restore commands are described in more detail in the Pg_dump Documentation and Pg_restore Documentation.)
Using the Jira setup wizard
Use this method if you have just installed Jira, and you are setting it up for the first time. Your settings will be saved to the dbconfig.xml file in your Jira home directory.

Set up application properties: Choose a database type (see the list of supported databases first), then configure the database connection. If you need help, see the guides on connecting Jira to a database.
Using the Jira configuration tool
Use this method if you have an existing Jira instance. Your settings will be saved to the dbconfig.xml file in your Jira home directory.
(Match your Jira test database configuration, and for more details, refer to the Jira application to the database. or Connecting Jira applications to PostgreSQL)
Step 3: Copy Attachments and Config Files
To ensure the test environment does not interfere with the production instance, specific system configurations must be adjusted (check Installing Jira applications for more details).
Migrate attachments, avatars, logos, and plugin folders
Change the HTTP port (e.g., from 8080 to 8081)
Disable outbound email by setting mail.mocked=true
Optionally use MailHog to safely preview emails
Enable SQL query logging to help debug issues
Step 4: Running the setup wizard and applying the Development License
Your Jira setup wizard guides you through the configuration process. To begin, access your new Jira instance via a web browser after completing the initial deployment.
Note that the fields displayed on this screen are identical to those on the Jira configuration tool.
If you're connecting to your own database, select Test connection to make sure Jira can connect.

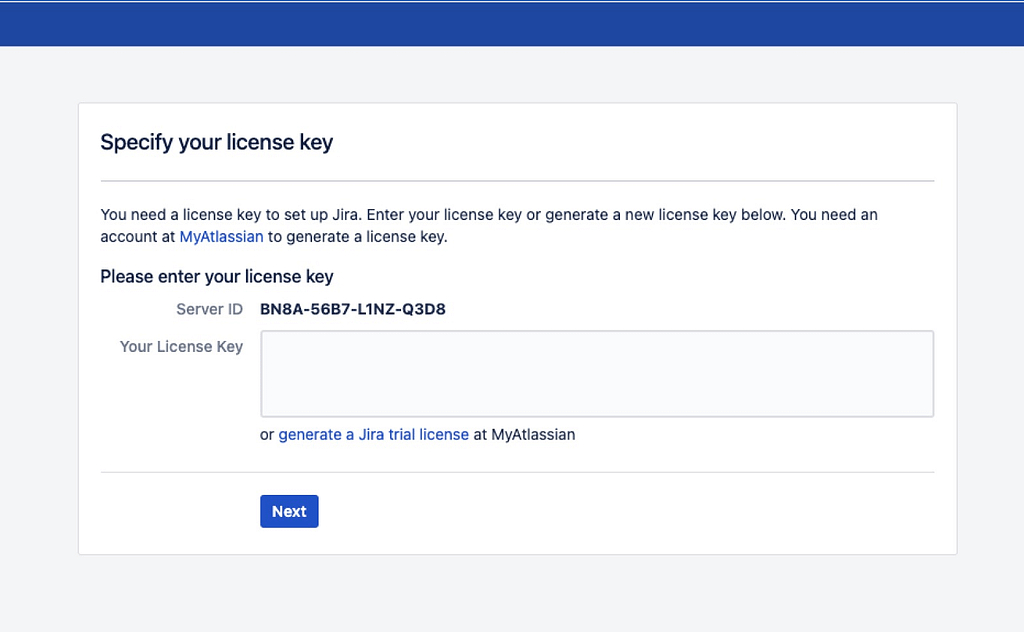
Step 5: Apply Developer License and Create Admin Account
Use Atlassian's Developer License portal
This step ensures the test instance remains fully functional while complying with Atlassian's licensing requirements for development and testing purposes. The license grants access to all features needed for thorough testing and development work, while clearly differentiating this from a production environment in terms of both usage rights and system capabilities. (For more details, check Running the setup wizard.)

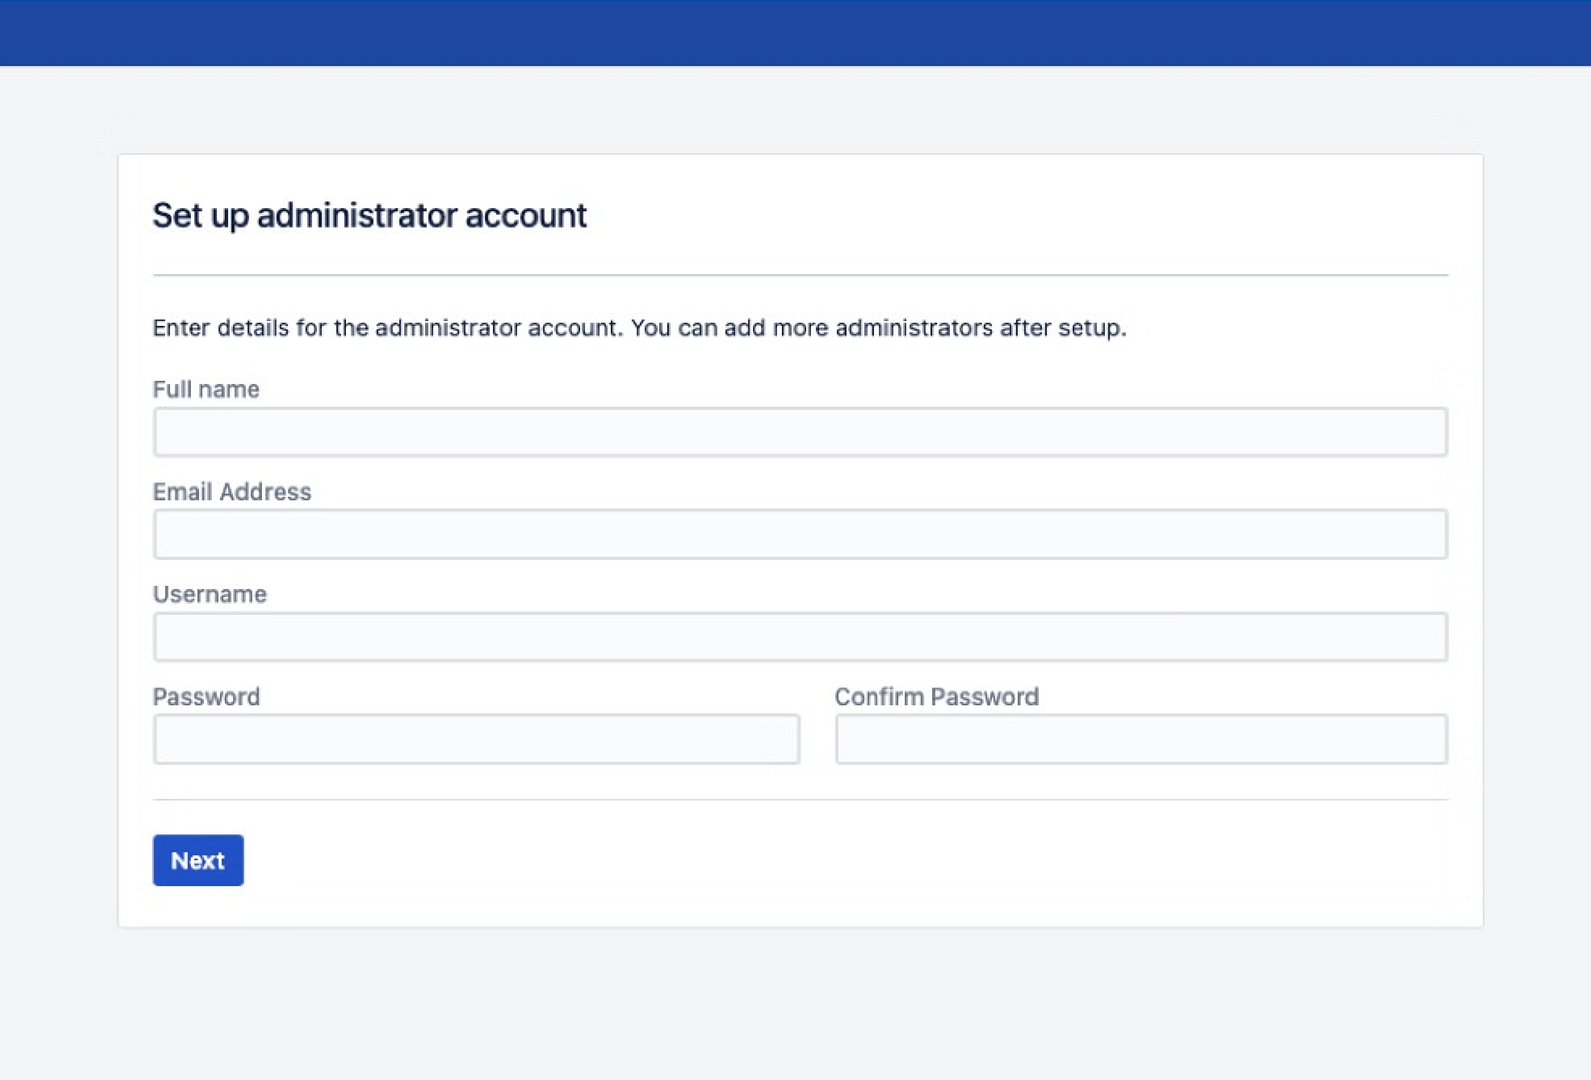
Set up the administrator account
Enter the details for the administrator account for the installation. The account will be granted the Jira system administrator permission. You can create additional Jira system administrator and Jira administrator accounts after you've set up Jira.


Further information:
If you need to change these settings after setting up your application, you can configure them via the Jira administration console. For details, see Configuring Jira options.
Jira will store your automated backups, file attachments, and indexes in your Jira home directory.
Linux Setup
The process for installing Jira Data Center on Linux is similar to Windows but involves Linux-specific commands and directory structures:
- Using shell commands and Linux paths
- Installer files: Download the Jira Software Linux installer (.bin file) or the archive file (.tar.gz) from Atlassian Jira Data Center Downloads.
- Create a dedicated Jira user and directories with proper permissions.
- Data Migration and Configuration Summary: For partial data migration, manually copy critical folders (attachments, avatars, logos, and plugins) from production to the test environment's Jira home directory using rsync for efficient transfer. Note that plugin licenses may require developer versions for testing.
This ensures the test environment mirrors production data while maintaining operational separation. (For more details, check Installing Jira applications on Linux)
Best Practices for Maintaining Your Jira Test Environment
Conclusion
Setting up a Jira Data Center test environment is a smart, practical way to protect your live system while improving confidence in every change you make. The setup doesn’t have to be complex, but it should always be thorough, isolated, and documented. When done well, it can be the safety net that keeps your team productive and your projects on track.
Key Takeaways
- Prepare all infrastructure, credentials, and backups
- Isolate your test environment completely
- Keep configurations and data refreshed
- Test upgrades and major changes before applying them live
For more about managing test environments from Jira, see our Test Environment Setup and Management Guide.